Java is a relatively new language created with portability in mind. It is is object-oriented and is similar to C++, but somewhat easier to use, and it incorporates a large library of GUI objects. Java code is compiled into an intermediate code that can run on any system that has a Java virtual machine (JVM) available. Some web browsers have a JVM built-in, making it possible to develop Java applets that can be loaded and run over the Internet.
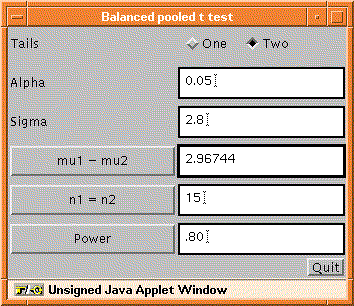
Figure 3: Java dialog for a pooled t test.
A simple but useful Java power-analysis dialogue is shown in Figure 3. Here we consider once again a balanced pooled t test. The dialogue window contains radio buttons for one or two tails, input windows for parameters of the test, and buttons that, when clicked, will solve for that parameter given the current values of the other parameters. In this instance we have a budgeted sample size of n=15 per treatment, and the user has just clicked on the button labeled mu1 - mu2. We find that, with the given parameters, we are able to detect a difference of means of about 3.0 with 80% power.
The dialogue in Figure 3 is simpler and cleaner than the one in Figure 2, partly because it covers a more restrictive setting but mostly because it puts more of the details out of the user's view. It is also more robust to user errors because it is impossible to overwrite any formulas. An interface like Figure 3 could be developed in Excel, but it probably wouldn't be, because all of the code would have to be in VB, rather than in formula cells of the workbook.
We now describe a much more sophisticated and flexible interface that has been created for studying the powers of the F tests in a balanced analysis-of-variance model. A single Java applet may be used for any such model; the model information is passed to the applet via HTML tags.
Java objects Factor, Term, and Model aid in keeping track of important information such as degrees of freedom, whether an effect is fixed or random, etc. Model has methods for obtaining expected mean squares (only the unrestricted model is implemented at this time), the appropriate denominator for testing each term (including a constructed error term if necessary), and the power of each test.
An additional GUI object, Bar, was created to enhance the interface. A bar is similar to a scrollbar except that it looks like part of a bar graph and it has a continuous value. It responds to clicking and dragging actions to change its value, unless that feature is disabled (for output bar graphs). A related object BarGroup displays a numerical scale and keeps track of scaling information for a set of related Bars. Rescaling can be done manually by dragging any point on the scale to a new destination.
To illustrate, consider a nested-factorial design similar to a recent student project at the University of Iowa: Two small model cars are tested together in trial runs on three different ramps, and the response variable is the distance (in cm.) traveled past the end of the ramp. A model for this experiment is

where i, j, and k index ramps, trials, and cars, respectively,
 ,
,  , and
, and  are fixed effects of ramps, cars, and interaction,
 are random trial effects, and
  are residual errors.
We have decided to quantify effect size in terms of standard deviations (SDs).
For a random effect such as  , the model specifies that these
effects are independent
, the model specifies that these
effects are independent  random variables; so the effect
size is simply
random variables; so the effect
size is simply  .
For a fixed effect such as
.
For a fixed effect such as  , the model constrains these effects to
sum to zero and the effect size is equal to the sample SD of
the
, the model constrains these effects to
sum to zero and the effect size is equal to the sample SD of
the  :
:

For a fixed interaction, the divisor is the degrees of freedom:

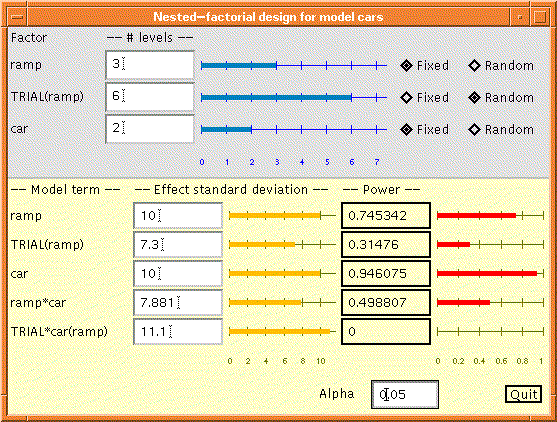
Figure 4: Java interface for a nested factorial design.
<APPLET
    code = "ANOVAPowerDialogApp.class"
    width = 0  height = 0 >

  <param  name = title    value = "Nested-factorial design for model cars">

  <param  name = factor0  value = ramp>
    <param  name = levels0  value = 3>

  <param  name = factor1  value = TRIAL>
    <param  name = etc1     value = ramp>
    <param  name = levels1  value = 5>

  <param  name = factor2  value = car>
    <param  name = levels2  value = 2>

</APPLET>
The Java GUI for this design is shown in Figure 4, and the HTML code
required to generate it is shown in Figure 5. The param
tags factorx (with  ) specify the names of the
factors, and levelsx give the starting number
of levels (modifiable later if desired). The etcx parameters,
if given, can specify fixed (the default), random, or
another term in the model---in which case the factor is taken to
be a random and nested in that term.
) specify the names of the
factors, and levelsx give the starting number
of levels (modifiable later if desired). The etcx parameters,
if given, can specify fixed (the default), random, or
another term in the model---in which case the factor is taken to
be a random and nested in that term.
The use of the interface is straightforward. In the top panel,
one can change the number of levels of any factor by clicking
on a bar's scale or entering it in a window. We can also use
radio buttons to change whether a factor is fixed or random. The
lower panel displays bars and input windows for the SDs of all
effects in the model and another set of bars (output only) displaying
the powers of the F tests. The tests are all assumed to have a
common size  entered in a window near the bottom. Another
GUI design could provide for separate
entered in a window near the bottom. Another
GUI design could provide for separate  s, but we consider
that to be not worth the extra clutter.
s, but we consider
that to be not worth the extra clutter.
In Figure 4, it was decided that an SD of about 10 cm would be
an effect size of scientific interest for either of the main effects.
Pilot data were used to obtain realistic values of
 and
and  . By increasing the
number of trials per ramp to 6, we are able to obtain acceptable
powers (about 75% and 95%) for the target main-effect sizes.
Then, dragging the mouse pointer on the ``ramp
. By increasing the
number of trials per ramp to 6, we are able to obtain acceptable
powers (about 75% and 95%) for the target main-effect sizes.
Then, dragging the mouse pointer on the ``ramp car'' bar until
the power is about 50%, we find that the required effect size is
about 7.9. This is a way of measuring the capability of the
proposed experiment with respect to its ability to detect variations
due to interaction between the two primary factors.
car'' bar until
the power is about 50%, we find that the required effect size is
about 7.9. This is a way of measuring the capability of the
proposed experiment with respect to its ability to detect variations
due to interaction between the two primary factors.