Getting Started with Mathematica
This first Mathematica Tutorial will be provided as printed document or web page. Its purpose is to introduce you to the use of Mathematica documents – called notebooks. After this, we will present further tutorials as Mathematica notebooks.
You are going to be reading these instructions in your web browser and following the instructions in the Mathematica program. If you like, just print out these instructions, so you don't need so many open windows on your computer screen.
Go to a computer lab (Engineering lab or ITC) and sit down at a computer to which you have access -- a Macintosh or Windows machine, or perhaps a Linux machine. Get someone to show you how to start the Mathematica program by double clicking on an icon, or, in Windows, by going through the Start menu on the lower left of the computer screen.
When Mathematica opens up, you see two or three Mathematica windows on the screen,
one a large blank document window, one a grey “pallet” with various
mathematical symbols on it, and possibly a welcome screen of some sort. Here
we are only going to use the blank document window, so slide the other windows
out of your way.
We are going to give the document window some better formatting features than it comes with to start with.
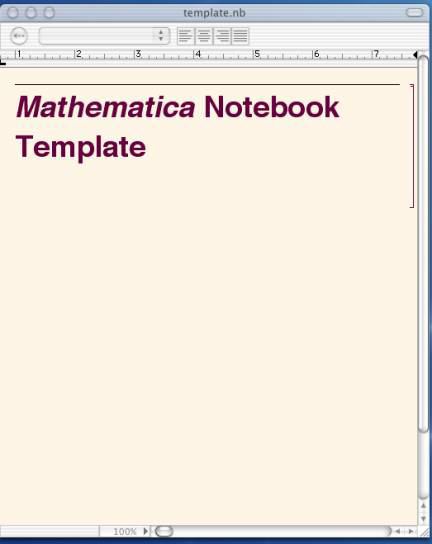
Your notebook now looks like this. (This is exactly the way it looks in Macintosh OS X; the appearance in Windows or in another operating system will be slightly different, but similar in all essentials.)
You have just made a template notebook, which you are going to use as a template for your further work. In the Mathematica File menu, choose “Save As”, and then fill in the dialogue boxes to save your file with the name template.nb. (In the Windows operating system, use the name "template"; the file type (.nb) will be added automatically.)
You are going to need to use this template notebook in further sessions, so
put it somewhere where you can get to it and use it in future sessions. If you are working on your Engineering lab account, you can save the file in your own account. If you are working on a stand-alone machine in an ITC, you could save the file on a floppy disc or email it to yourself.
Now open your template notebook, and immediately save a copy as notebook1.nb
(use the File menu -> Save As mechanism, as before.)
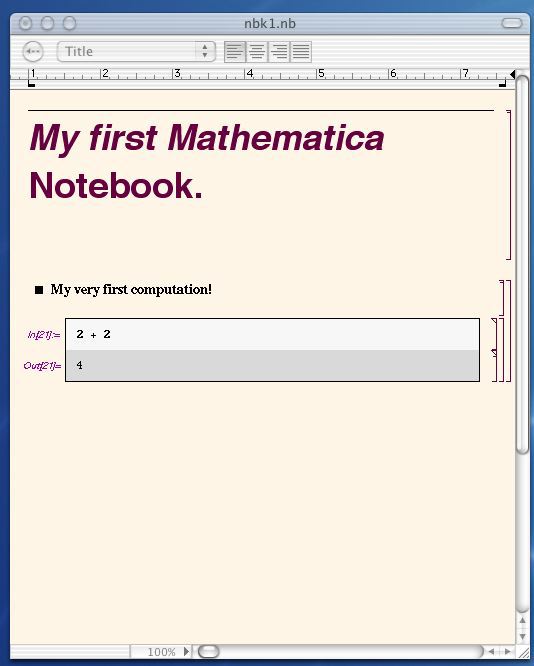
In your new notebook1.nb, change the title to “My first Mathematica Notebook”
or something similar.
Just below the new title, click with the mouse and press the return key to open
a new cell. Use the notebook’s drop down menu as before to change the
type of the cell, this time to “Subsection”. Click somewhere to
the left of the red bracket and type: “My first computation.” Now
open yet another new cell below this cell, type 2 + 2, and hit enter (the rightmost
enter key on a Mac or Windows keyboard) or shift+return (shift and return at
the same time) to cause Mathematica to evaluate this expression. Out comes the
answer 4 in a new cell, which is grouped with your 2+2 cell, like this.

If you didn’t get the output but only opened a new line in your input cell, you must have hit return instead of using the rightmost enter key or shift-return. The Mathematica program responds differently to the return key and to the enter key, or shift+return combination.
You can group the cells containing this impressive computation with the “subsection” cell just above as follows: Hold the mouse key down and slide the mouse cursor over the red brackets delineating the “subsection cell” and the computation cells. In this way you select the group of cells. Now with the mouse, select
Cell menu -> Cell Grouping -> Group Cells.
If you double click on the new group of cells, the computation cells disappear, leaving only the subsection cell as a title. Double click again and the whole group reappears.
At this point, your notebook1.nb looks like this:
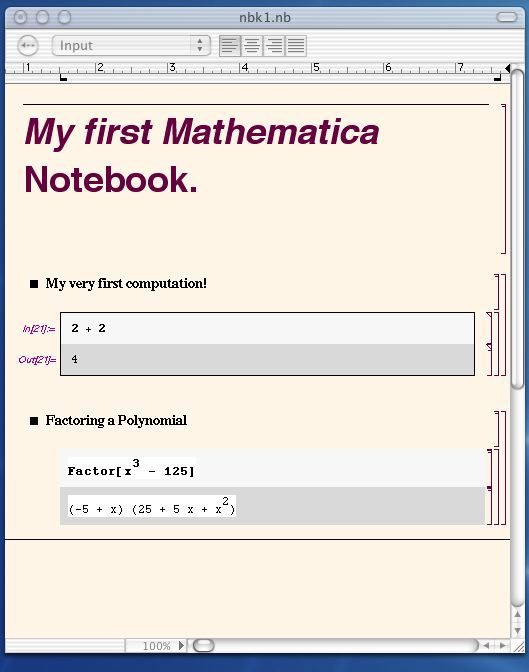
Next, open up a new subsection cell, which you can label as “Factoring a polynomial”. Below this, in a new input cell, type the expression
Factor[x^3 – 125]
It is necessary to spell Factor with the initial capital and to use square brackets
instead of any other type of parenthesis or brackets. Hit enter, and out pops
the factorization. Group together your new subsection cell and the new computation
cells.
Now your notebook looks like this:
Let’s put a couple more computations in our notebook before going on to the other Mathematica tutorials.
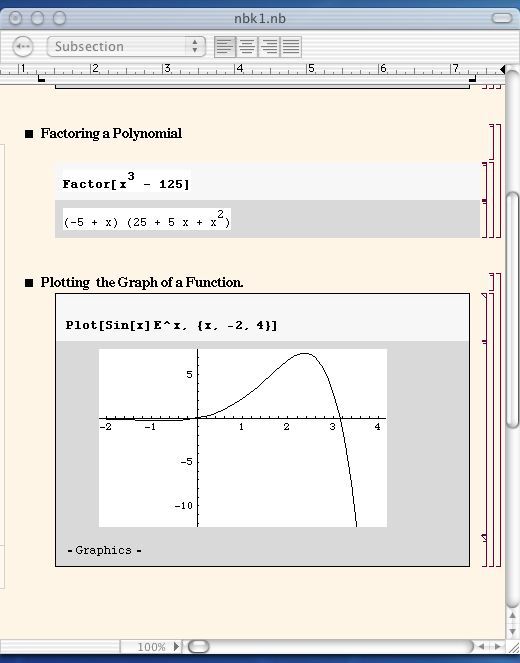
For our third computation the label for the subsection could be “Plotting
the graph of a function”, and the input for the computation will be:
Plot[Sin[x] E^x, {x, -2, 4}]
Again, it is necessary to use capital letters for Sin and E, and to use the
two types of brackets exactly as shown.
After you are done, your notebook will look like this. (It wasn’t possible
to get the whole notebook to be on the display at one time.
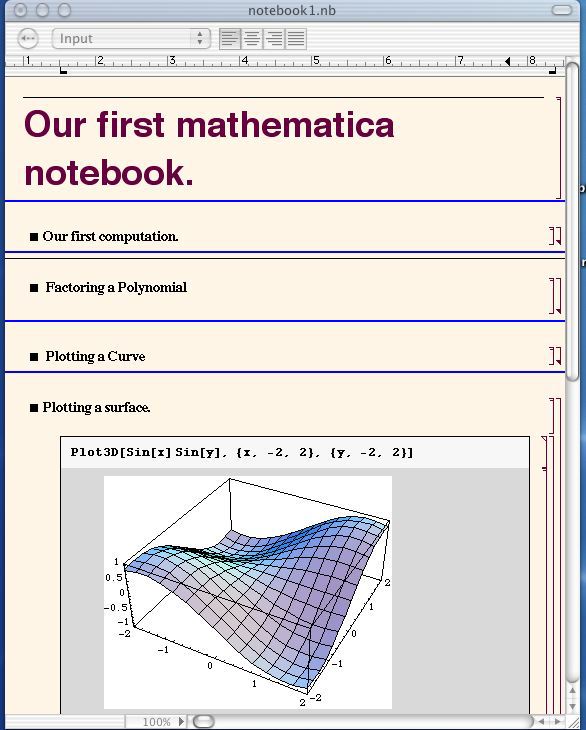
For our last computation, we are going to plot the graph of a surface. The title of our new subsection could be "Plotting a surface” and the input for the new computation is
Plot3D[Sin[x] Sin[y], {x, -2, 2}, {y, -2, 2}]
It is necessary to use capital letters, the two kinds of brackets, and commas
exactly as shown. Group your subsection cell and the computation cells as before
to make a fourth computation group.
Before displaying the result, let’s double click on our previous computation
groups to make the details disappear, leaving only the titles of the groups.
To make things pretty, let's also draw some horizontal lines between our computation
groups, by choosing
Format menu -> Horizontal lines -> Paste Medium Line object.
Our notebook finally looks like this:
Save the result, and maybe print it out to show your friends and family. You now know how to enter and save computations in Mathematica.
In the future, when you prepare homeowork with Mathematica to submit electronically, please always open your template.nb as a starting
point for your work; replace the title with something appropriate, and save
the new notebook with an appropriate title, by choosing
File menu -> Save As.
As you work, it is a good idea to save your notebook frequently, in case something goes wrong and you want to return to a previous version of your work.